Polvere, sporco, e le macchie sul sensore possono portare a punti e imperfezioni indesiderati nelle tue foto, Soprattutto quando si scattano aperture strette. Se hai notato punti scuri nelle tue immagini, Potrebbe essere il momento di pulire il sensore della fotocamera. In questa guida, Ti guideremo attraverso i gradini per pulire in modo sicuro ed efficace il sensore della fotocamera, Garantire che le tue foto rimangano nitide e senza punti.
Perché la pulizia del sensore della telecamera è importante?
Il sensore della tua fotocamera è il cuore dell'attrezzatura fotografica. Col tempo, polvere e detriti possono accumularsi sul sensore, in particolare quando si cambia lenti. Ciò può comportare punti visibili nelle tue immagini, Soprattutto nelle aree con colori uniformi come cieli o sfondi bianchi. La pulizia regolare del sensore non solo migliora la qualità dell'immagine, ma estende anche la vita della fotocamera.
Strumenti di cui avrai bisogno per la pulizia del sensore della fotocamera
Prima di immergersi nel processo di pulizia, Raccogli i seguenti strumenti:
- Tamponi per la pulizia dei sensori: Progettato specificamente per i sensori della fotocamera, Questi tamponi sono privi di lanugine e sono disponibili in varie dimensioni per abbinare il tuo sensore.
- Soluzione di pulizia dei sensori: Un fluido di pulizia specializzato che evapora rapidamente senza lasciare residui.
- Rocket Blower: Un soffiatore portatile per rimuovere le particelle di polvere sciolta.
- Lumpicio Lupe o ambito di sensore: Ti aiuta a ispezionare il sensore per polvere e detriti.
- Panno in microfibra: Per pulire il corpo della fotocamera e le aree circostanti.
- Guanti: Per evitare che le impronte digitali e l'olio si trasferiscano al sensore.
Guida passo-passo per la pulizia del sensore della fotocamera
Fare un passo 1: Prepara il tuo spazio di lavoro
Scegli un pulito, ambiente privo di polvere per ridurre al minimo il rischio di introdurre nuovi detriti. Un'area ben illuminata o una scrivania con una superficie pulita è l'ideale. Spegni la fotocamera per evitare l'elettricità statica, che può attirare polvere.
Fare un passo 2: Ispezionare il sensore
Imposta la fotocamera sulla modalità di pulizia manuale (Controlla le istruzioni del manuale della fotocamera). Questo blocca lo specchio ed espone il sensore. Utilizzare una lente d'ingrandimento o un ambito del sensore per ispezionare il sensore per la polvere, punti, o sbavature.
Fare un passo 3: Rimuovere la polvere sciolta con un ventilatore a razzo
Tieni la fotocamera rivolta verso il basso e usa un ventilatore a razzo per rimuovere delicatamente le particelle di polvere sciolte. Evita di toccare il sensore con il soffiatore, e non usare mai aria compressa, poiché può danneggiare il sensore.
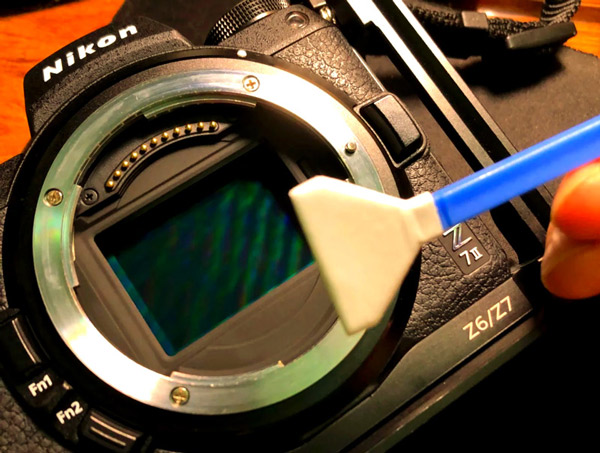
Fare un passo 4: Usa tamponi per la pulizia dei sensori
Se la polvere persiste, È tempo di utilizzare un tampone per la pulizia del sensore. Applicare alcune gocce di soluzione di pulizia del sensore al tampone (non satura troppo). Scorrere delicatamente il tampone attraverso il sensore in una direzione, Quindi capovolgilo e scorre nella direzione opposta. Evita di premere troppo forte o di andare nella stessa area più volte.
Fare un passo 5: Ispezionare di nuovo
Dopo la pulizia, Ispeziona nuovamente il sensore usando la lente d'ingrandimento o l'ambito del sensore. Se rimangono punti, Ripeti il processo con un tampone fresco.
Fare un passo 6: Riassemblare e testare
Esci dalla modalità di pulizia manuale e riattacco l'obiettivo. Fare una prova di una pianura, superficie uniformemente illuminata (Come una parete bianca o un cielo) In una stretta apertura (f/16 o superiore). Rivedi l'immagine per qualsiasi punto rimanente.
Suggerimenti per mantenere un sensore pulito
- Prevenire la polvere: Spegni sempre la fotocamera prima di cambiare lenti, e fallo in un ambiente pulito.
- Usa tappi di lenti: Tieni le lenti e il corpo della fotocamera limitato quando non in uso.
- Ispezioni regolari: Controlla periodicamente il tuo sensore, soprattutto dopo aver sparato in condizioni polverose o ventose.
- Pulizia professionale: Se ti senti a disagio a pulire il sensore da solo, Considera di portare la fotocamera da un professionista.