A card printer adhesive cleaning roller is an essential maintenance tool designed to remove dust, debris, and contaminants from ID card printers. It ensures the optimal performance of leading brands like Zebra, Fargo, Datacard, and Magicard by preventing print defects and prolonging the life of the printer.
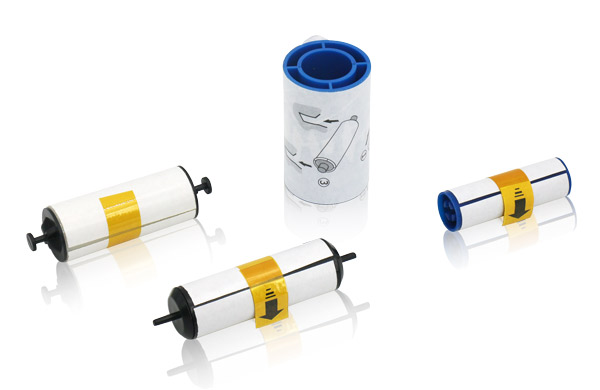
Material and Appearance of Adhesive Cleaning Rollers
The adhesive cleaning roller is typically composed of a sticky polymer or silicone-based material that effectively captures fine particles from blank ID cards before printing. The roller appears as a cylindrical unit, often encased in a plastic frame, making it easy to install and replace within the printer.
Why Is an Adhesive Cleaning Roller Important?
Card printers are precision devices that require a clean and dust-free environment to function correctly. Dust or debris on the card surface can cause:
- Poor print quality (e.g., smudges or streaks)
- Damage to the printer’s printhead
- Increased wear and tear on printer components
Using an adhesive cleaning roller helps prevent these issues by ensuring that cards are free of contaminants before printing. This small step in your maintenance routine can significantly extend the lifespan of your printer and improve the quality of your prints.
How to Use a Card Printer Adhesive Cleaning Roller
Using a card printer adhesive wheel is a simple process. Follow these steps to ensure effective cleaning:
Step 1: Power Off the Printer
Before replacing or installing an adhesive cleaning roller, ensure the card printer is powered off and unplugged to prevent any accidental damage.
Step 2: Locate the Roller Slot
Each printer brand, such as Zebra, Fargo, Datacard, and Magicard, has a designated slot or holder for the adhesive roller. Refer to the user manual for precise instructions.
Step 3: Remove the Old Roller (If Applicable)
If replacing an old roller, carefully remove it from the slot. Be mindful not to touch the adhesive surface to maintain its effectiveness.
Step 4: Install the New Adhesive Roller
Place the new adhesive cleaning roller into the designated slot, ensuring it is securely positioned for optimal performance.
Step 5: Close the Printer and Run a Cleaning Cycle
After installing the roller, close the printer cover and, if necessary, run a cleaning cycle through the printer’s settings to allow the roller to pick up any residual dust.
Why Choose High-Quality Adhesive Cleaning Rollers?
Investing in high-quality adhesive cleaning rollers from trusted brands like Meditech ensures reliable performance and reduces the risk of printer downtime. Cheap or counterfeit rollers may save money upfront but can lead to frequent replacements and poor print quality.